
Reviewed · STIRLING TOURS
Braveheart (Battle of Stirling Bridge) Tour
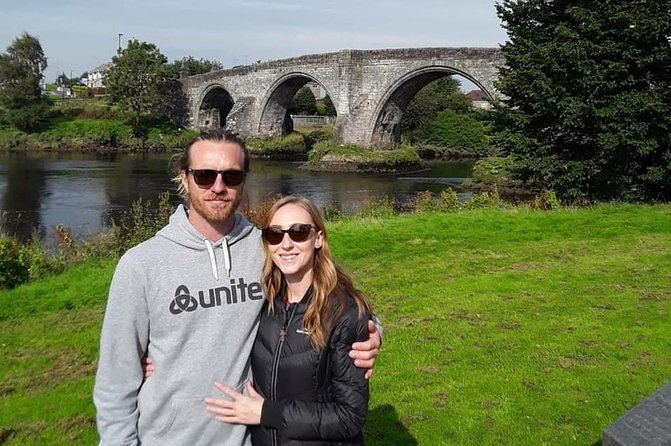
Stirling Bridge is one of those Scottish places where a few steps can take you straight into the Wars of Independence. This small-group history tour follows the story around the Old Stirling Bridge area, with the 1297 Battle of Stirling Bridge at the center of it.
I especially like two things. First, the meeting point is right by the Old Stirling Bridge, so you are not wasting time getting to the action. Second, the guide, often Steven (and his team, including Molly), brings the battle to life with extra tools on site, like a tablet/map for the original wooden bridge spot, and even a model that shows what the bridge may have looked like.
One thing to consider: this is an outdoor walking experience where you will stand for parts of it, and Scotland weather matters. If conditions are poor, the tour may be rescheduled.
Key points for the Braveheart Battle of Stirling Bridge tour
- Meeting right at the Stirling Old Bridge area for a fast start and easy orientation
- Max 15 travelers for a more personal, question-friendly pace
- Andrew De Moray and William Wallace get real context, not just movie snippets
- You can see where the old wooden bridge likely stood and where it collapsed in the battle
- The guide often explains common Braveheart-style myths and the likely historical picture behind them
- Follow-up resources like video links may be shared after your visit
Meeting at Stirling Old Bridge, and how the 1 to 1.15 hour format feels
You meet in the Stirling Old Bridge area, by the River Forth, at Stirling FK8 1AQ. The advantage is simple: you are already in the right place. No long bus ride, no wandering around town trying to “find the bridge.” You start your story where the story happened.
The tour runs about 1 hour to 1 hour 15 minutes, which is a sweet spot. Long enough to connect names like William Wallace and Andrew De Moray to the terrain, short enough that you can still do other Stirling plans the same day. If you are also visiting Bannockburn, this timing can slot in well without exhausting your legs.
Because this is outdoors, wear footwear that can handle uneven ground and damp patches. Plan to stand as well as walk. If you only want to “pass by” history, this may feel too narrative and too grounded in details. If you like your history practical and place-based, you’ll likely enjoy it a lot.
Other days out from Stirling worth comparing
- Stirling Old Town Daily Walking Tour (11am & 2pm)
★ 5.0 · 279 reviews - Bannockburn Battlefield Tour
★ 5.0 · 36 reviews - 3 Hour Private Tour of Stirling Old Town and Stirling Castle
★ 5.0 · 17 reviews
Stop 1 at Stirling Bridge: walking the battle story where it happened
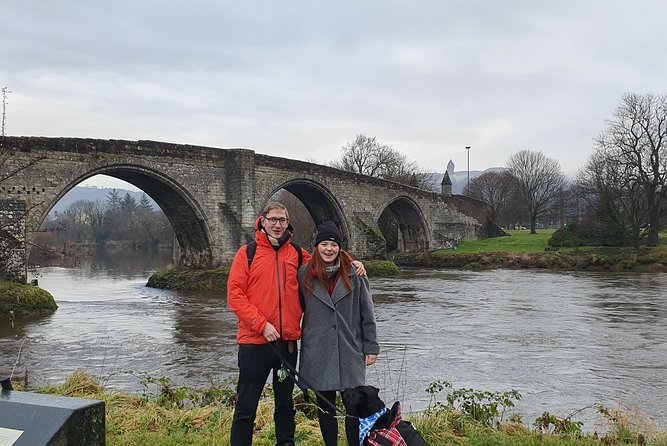
The heart of the tour is the walk at Stirling Bridge. This is where you get to relive Scotland’s first major victory in the Wars of Independence, tied to the 1297 conflict.
What makes this stop special is that the guide does not treat the battle like a distant legend. You are literally moving through the same general area where major decisions unfolded. As you go, you connect the story beats to what you can see around you, then you get a clear sense of why the bridge mattered so much.
You will also get help visualizing the missing piece. The original wooden bridge is long gone, so you can’t simply look and say, “There it is.” Instead, the guide shows where it likely was, and where it would have failed during the battle. In at least one case, you even hear about a tablet and other visuals used to explain the bridge location and collapse point when there is little trace left on the ground.
A small warning that is really just honesty: you are not touring a museum building. This is an outdoor, on-foot history stop. That is the point, but it does mean your “wow” comes from learning how the landscape fits into the story, not from walking through reconstructed sets.
William Wallace and Andrew De Moray: why their names matter here
It is easy to know William Wallace as a headline name. It is harder to understand why he shows up at just the right moment in Scottish independence history. This tour focuses on the early days and rise of Wallace and Andrew De Moray, then tracks how their leadership and the battle’s outcome pushed them forward in the story.
The guide frames Wallace and De Moray as more than famous figures. You learn how they became central to the vanguard of Scottish history around this time period, and how the battle fits into the broader struggle for independence rather than acting like an isolated event.
There is also a fun, modern twist that helps the history land. You will hear a prompt about an Andy Murray connection, then the tour steers you toward how these figures relate to the people and the “guardian” role tied to Scotland’s identity in that era. It is the kind of small joke that keeps the pace friendly while you still get serious context.
If you are coming from movie knowledge, this is where you can recalibrate. The tour is built to explain what is likely in the record, what is exaggerated, and why some popular retellings drift away from the historical picture.
The Braveheart myths: what you’ll hear corrected along the bridge
Let’s be real: many people arrive with Braveheart in their heads. This tour doesn’t ignore that. It tackles the difference between cinematic shorthand and how the event likely played out.
You can expect a clear focus on debunking incorrect tales, especially ones that blur the timeline or misplace key elements of what happened around Stirling Bridge. The guide uses the physical setting to show why certain dramatic versions just do not match the geography or timeline.
This is one of the most praised parts of the experience because it makes your time feel grounded. You leave with better “mental pictures,” not just a list of names. And if you like being challenged in a friendly way, you’ll probably enjoy the back-and-forth nature of the talk, especially when questions come up.
If this one is full, Stirling also has:
- Private Stirling Old Town Tour
★ 5.0 · 8 reviews - Private Tour of the Highlands, Glencoe and Castles from Stirling
★ 5.0 · 7 reviews
The small-group setup: why max 15 matters on a history walk
A tour capped at 15 travelers changes the whole vibe. On a battlefield-style walking tour, you cannot just rattle facts. People need to hear, see, and then ask follow-up questions. In a smaller group, the guide can slow down when you want to understand something like bridge placement, timing, or who acted when.
It also tends to make the tour feel less rigid. In at least one documented case, the group size ended up being extremely small, which gave the guide room to adjust and add extra hospitality. You should not plan on being the only guests, but the lesson is real: with fewer people, you get more attention.
If you are the type who stops and asks, this size is a win. If you are the type who just wants to quietly listen, it is also a win because you are not competing with a loud crowd for the guide’s best explanations.
Price and value: is $34.45 a fair deal for 1 hour?
At $34.45 per person for roughly 1 hour to 1 hour 15 minutes, you are not buying a bargain tour. You are paying for a guided interpretation at an ideal location, with a limited group size and extra on-site visuals.
Here is where the value comes from, in practical terms:
- You start at the right spot, by the bridge area, which saves time and confusion.
- You get a guide who can point to likely locations even when almost nothing is physically left to see.
- You get a focused story with key figures, instead of a general “walk and read plaques” experience.
If you are a history person, this price can feel justified because you are buying context and translation. If you are not that into historical detail, you might feel it is overpriced compared to a self-guided stroll. The good news is you can still do a self-walk before or after, then let the guide turn the facts into a coherent story.
What to look for during your walk: practical expectations
You do not need to be an expert to do this tour. The guide’s job is to turn the battle into understandable pieces you can hold in your head. Still, it helps to bring a little curiosity.
As you go, keep your eyes open for the specific things the guide highlights:
- The original wooden bridge location concept, and where the collapse would have happened
- How Wallace and De Moray connect to the timing and turning points of the battle
- Where common movie claims differ from the likely historical view
Also, come with comfortable shoes and a plan for the weather. Scotland can do four seasons in a day. Even if the tour time is short, wet ground and wind can affect your comfort.
One more thing I appreciate is the guide’s emphasis on welcome. The vibe described by people who visited is friendly, warm, and question-oriented. That matters because battlefield history can feel heavy. A good guide keeps it human, then sharpens the facts.
Who this tour suits best, and who might want a different plan
This tour fits you well if you:
- Like Scottish history around Stirling and want it placed directly on the ground
- Want stories tied to real names like William Wallace and Andrew De Moray
- Prefer a small group where you can ask questions
- Like correcting misconceptions, especially if you came in on Braveheart
You might want a different option if you:
- Want a long sightseeing day with big attractions
- Are only interested in photo stops and short comments, not explanations
- Dislike outdoor walking, or you know you struggle standing for parts of an experience
If you are doing Stirling plus Edinburgh, this is a good “close to town, focused on one story” add-on.
FAQ
FAQ
How long is the Braveheart (Battle of Stirling Bridge) tour?
It runs about 1 hour to 1 hour 15 minutes.
Where do I meet for the tour?
The meeting point is Stirling Old Bridge, River Forth, Stirling FK8 1AQ, UK, and the tour ends back at the meeting point.
How big is the group?
This experience has a maximum of 15 travelers.
What language is the tour offered in?
The tour is offered in English.
Is admission required for the stop?
The stop at Stirling Bridge notes admission ticket free, so you are not paying a separate admission fee for that part of the experience.
What if the weather is bad?
The tour requires good weather. If it is canceled due to poor weather, you will be offered a different date or a full refund.
Should you book this Stirling Bridge Battle tour?
I’d book it if you want history you can actually place in your head. The best part is the combination: small-group pace, a guide who can explain the battle around the bridge area, and the chance to understand where the old wooden bridge may have been when almost nothing is left to see.
If your idea of history touring is reading a plaque and moving on, you might not get enough from 1 hour. But if you enjoy learning how key figures like William Wallace and Andrew De Moray connect to the geography of Stirling Bridge, this is exactly the kind of short, high-impact tour that makes a trip feel smarter.
Just reviewed around Stirling
- Private Tour of the Highlands, Glencoe and Castles from Stirling★ 5.0 · 7 reviews
- Private Stirling Old Town Tour★ 5.0 · 8 reviews
- Bannockburn Battlefield Tour★ 5.0 · 36 reviews
- 3 Hour Private Tour of Stirling Old Town and Stirling Castle★ 5.0 · 17 reviews
- Stirling Old Town Daily Walking Tour (11am & 2pm)★ 5.0 · 279 reviews
Stirling Tours, compared.
Stirling Old Town Daily Walking Tour (11am & 2pm)
Read our review →
3 Hour Private Tour of Stirling Old Town and Stirling Castle
Read our review →
Private Tour of the Highlands, Glencoe and Castles from Stirling
Read our review →Browse the lists this tour appears in